Configure your local Let's Encrypt solution

You are a developer, someone with a "homelab" that offers services, or a security administrator, and you want to implement HTTPS security?
You can manually create a Root CA and then generate certificates when you need a new one.
In my case, I wrote a procedure to not forget the command lines, but I was a little bit bored doing the same things each time I need a new certificate, because I have to:
- Retrieve the Root CA
- Retrieve my documentation
- Create the configuration file
- Execute commands to generate the new certificate
- Drop the certificate on my reverse proxy or server directly
You may have heard about Let’s Encrypt - it is an amazing solution to generate certificates on demand and automatically. Unfortunately, it won’t issue certificates for private domains (e.g., .home, .lab, .local, etc.).
I was frustrated because I am using Nginx Proxy Manager, which works only with Let's Encrypt to generate and renew certificates.
So how can we get the same automatic certificate management experience, but fully local 💪
I decided to invest time in finding a way to reproduce the Let's Encrypt behavior without a script, manual renewal, and all of this, locally.
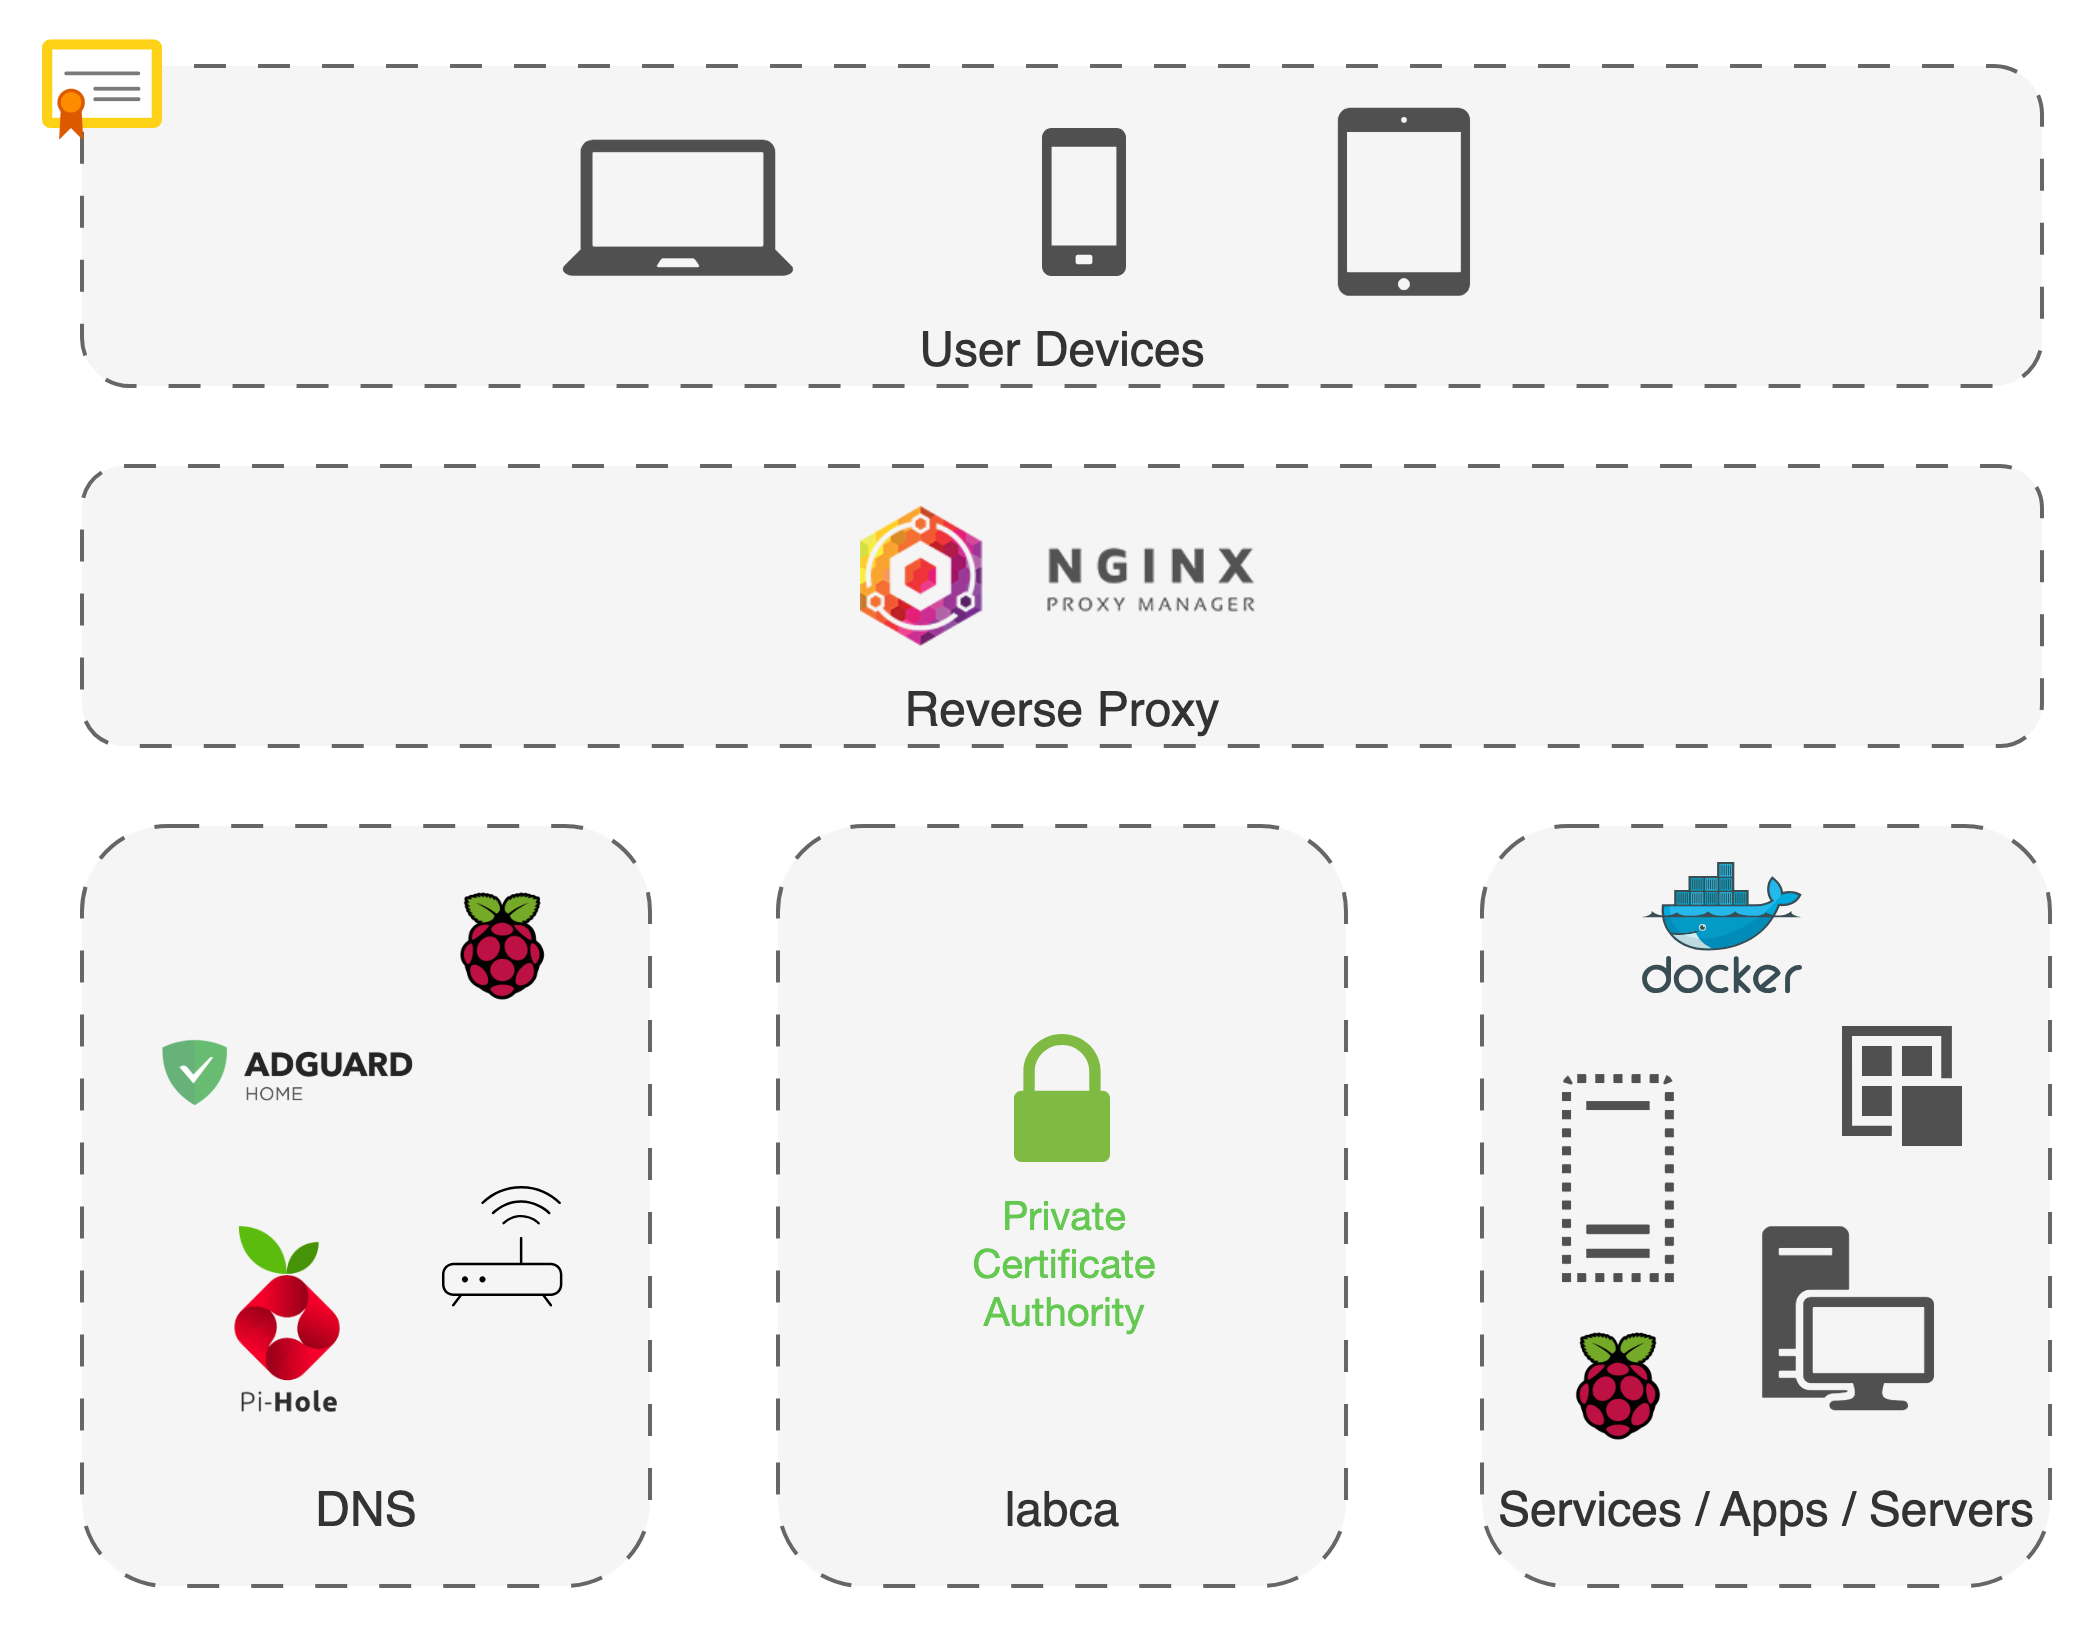
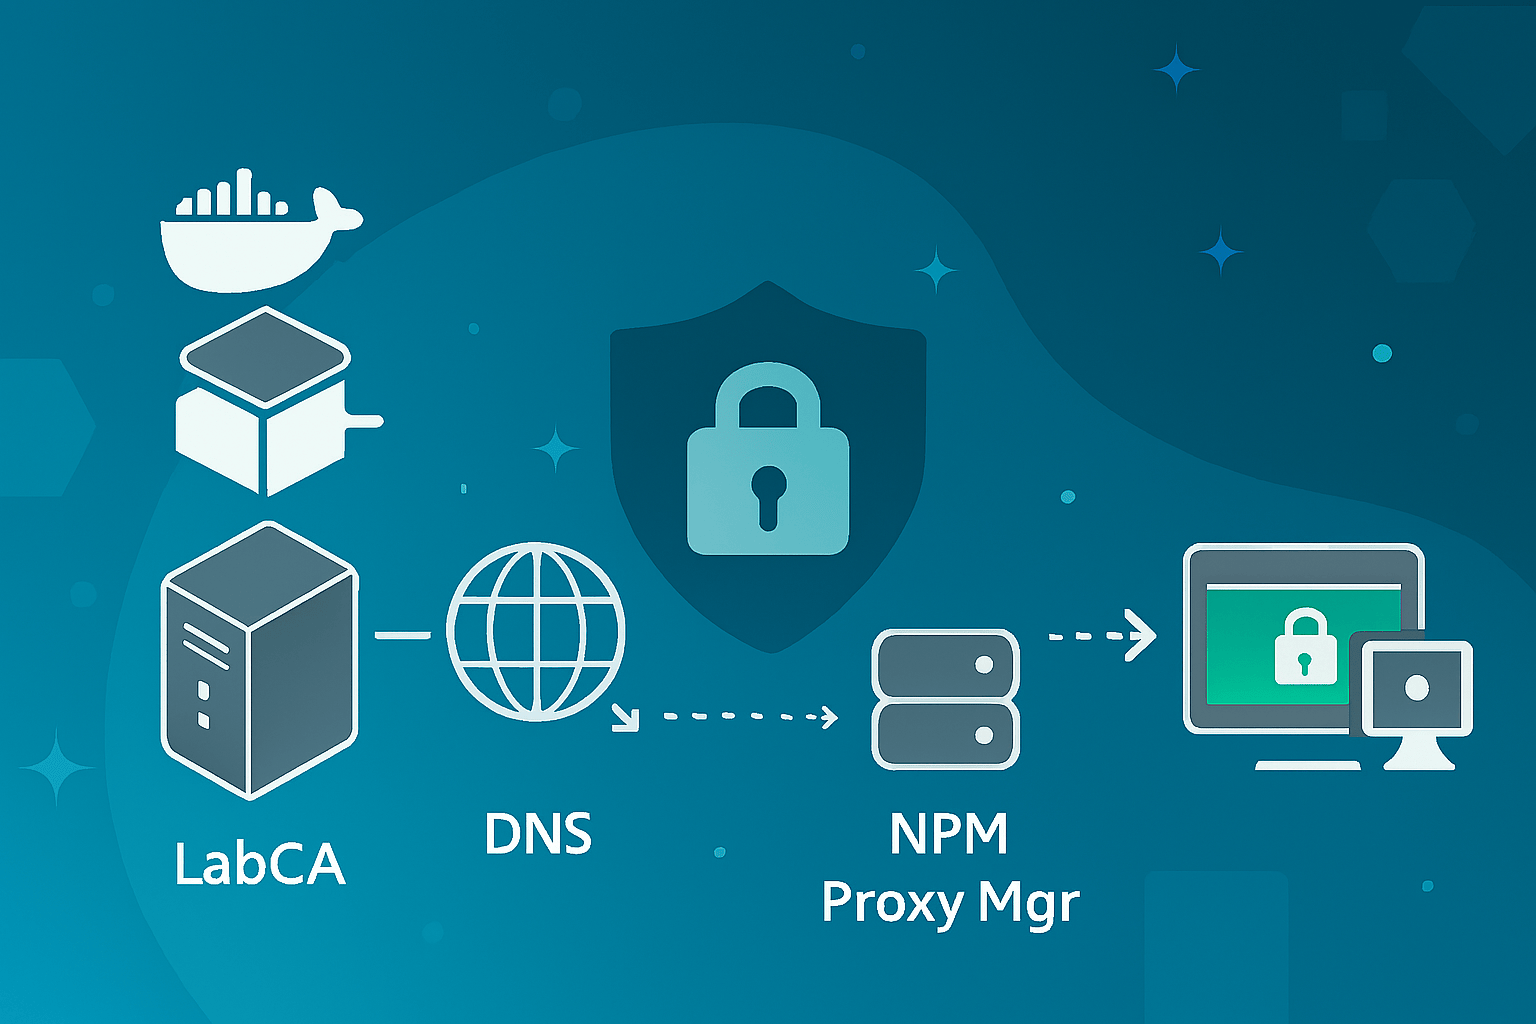
Network
Network: 192.168.0.0/24
Router/Gateway: 192.168.0.1
DNS: 192.168.0.250
NPM: 192.168.0.220
LabCA: 192.168.0.200
LabCA
[info] Important
Your LabCA instance must have a static IP Address in your network.
To generate a certificate "on the fly", you can build your own stack with all required services... If you want to use a solution that provides a similar service to Let's Encrypt, you can use LabCA.
As explained on the website of the solution, LabCA is: "A private Certificate Authority for internal (lab) use, based on the open source ACME Automated Certificate Management Environment implementation from Let’s Encrypt (tm)."
What I appreciate most about this solution:
- User web interface - it is easy to download the Root CA from any device.
- Admin web interface - keep an eye on the issued certificates.
- Don't need to have deep knowledge of ACME, Boulder, and other services and configurations.
- It's quite easy to set up - Docker Compose + wizard configuration.
[info] Important
You cannot run the Docker stack on a Raspberry Pi because of boulder.
It is possible to switch Boulder by step-ca.
Some additional configuration must be performed, and we will see that in the next steps.
Reverse Proxy
[info] Important
Your Reverse Proxy server must have a static IP Address in your network.
A Reverse Proxy is one of the most important parts of the infrastructure. There are a couple of solutions, but not all of them support Let's Encrypt SSL. Of course, you can secure your application directly by depositing the certificates, but you have to connect to each of them and configure the SSL (if supported).
Using a reverse proxy allows for one place that redirects the network flows and allows for encryption of the communication.
I choose to use Nginx Proxy Manager because the solution provides a friendly admin web interface.
NPM requires manual configuration of the Proxy Hosts and can be used for everything.
If you are essentially using Docker containers, and you want to automate everything, you can use letsencrypt-nginx-proxy-companion + jwilder/nginx-proxy - this solution looks more secure because you don't have to expose the admin interface, and by simply adding environment variables to your Docker Compose, the proxy hosts are configured as well as the certificates.
DNS
Whatever your DNS server, at least you can configure a custom DNS response, it's ok 😁
I just focused on AdGuard Home, which is a great alternative to Pi-Hole. AdGuard Home offers a friendly admin interface, easy to maintain, that does not require advanced skills to configure and secure your home network.
I ❤️ it for the following reasons:
- Polished web interface
- Once configured as a DHCP server, you can control all of your devices
- DNS rewrite feature (an important feature in our use case)
- Blacklist - there are a couple of lists provided by the community
- Built-in DNS encryption
- Flexible parental control (if you have kids)
[note] Note
In this case, ADGuard Home is configured as DHCP server as well.
Set up
Your local domain
Your DNS server must be configured to ensure the root domain is reachable.
If your domain name is .home, .lab, .my, etc., you must add an A (IPv4) or an AAAA (IPv6) record. My suggestion is to use your DNS server IP address.
A home 192.168.0.250home replace it with your local domain name.
192.168.0.250 replace it with your DNS server IP address.
Install and configure your LabCA
Configure your DNS server to create a LabCA FQDN:
A labca.home 192.168.0.220labca.home replace it with your LabCA FQDN.
192.168.0.220replace it with your NPM server IP address.
Edit Docker Compose at the nginx service to update the port like this:
nginx:
  image: nginx:latest
  restart: always
  networks:
    - bouldernet
    - npm-network
  ports:
-    - 80:80
+    - 5080:80
-    - 443:443
+    - 5081:443
  volumes
LabCA Docker Compose file
Configure your NPM
Your reverse proxy must trust your certificate authority (LabCA), and it must serve the full chain ( cert.pem + intermediate.pem + root.pem) to avoid browser errors.
To be able to communicate and generate certificates, you must provide the Boulder Root CA.
From the Boulder container, retrieve the minica.pem certificate:
/opt/boulder/labca/certs/ipki/minica.pemThen, drop the certificate into your reverse proxy (I changed the extension of the file):
/usr/local/share/ca-certificates/minica.crt[info] Important
If you have updated your container, you will need to reconfigure the certificate.
[success] Tip
Bind a persistent certificate file or folder to not have to copy it again.
Now, you must update the reverse proxy certificates
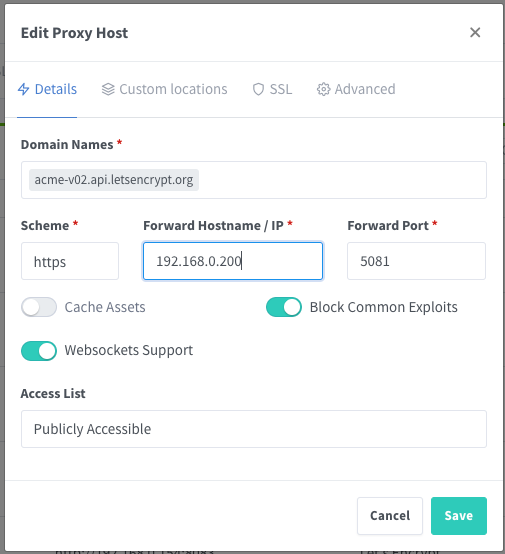
update-ca-certificatesCurrently, your FQDN labca.home is redirected to your NPM server. It is necessary to create a new host to redirect labca.home to your LabCA server:
Domain Names: labca.home
Scheme: https
Forward Hostname / IP: 192.168.0.200
Forward Port: 5081
Override NPM
That is the funniest part of the setup 😉
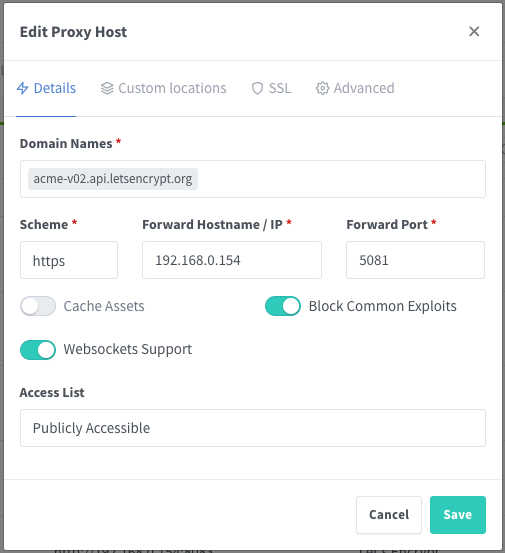
From your DNS server, rewrite Let's Encrypt API URL and generate a custom certificate
- https://acme-v02.api.letsencrypt.org ⟶ https://labca.home
[info]Important
In my case, I choose the rewrite the Let's Encrypt ACME URL for my whole local network (not just the NPM server).
Thanks to this, I can use my local ACME server for other services or devices to generate certificates (ex: Synology NAS, local developments from my computer, etc.).
If you want only NPM server impacted, edit the/etc/hostsof your NPM server only.
Then, from the NPM, create a new Proxy Host:
Configure custom locations
- /directory ⟶ http://192.168.0.200/directory:5081
- /acme ⟶ https://192.168.0.200/acme:5081

SSL
The Boulder server has a script that is used to generate the basic certificates required for the system run.
As explained in the README.md, you can edit this file to generate additional certificates on the same configuration as the certificates that will be generated automatically.
Edit the file /opt/boulder/labca/certs/generate.sh, and add the line below to the ipki()Function:
# background without racing to create it.
minica -domains localhost --ip-addresses 127.0.0.1

+ # Create a local Let's Encrypt cert which can be used by NPM to simulate the endpoint
+ minica -domains "acme-v02.api.letsencrypt.org"

# Used by challtestsrv to negotiate DoH handshakes. Even though we think of
You can try to launch generate.sh but in my case, the Let's Encrypt certificates were not generated. So, I chose to move the ipki folder to ipki.prev and reboot the LabCA stack to enforce a new generation.
Once done, retrieve your new Let's Encrypt certificate located in the folder acme-v02.ap.letsencrypt.org and add it to NPM to configure SSL for your local acme-v02.ap.letsencrypt.org.
SSL Certificates ⟶ Add SSL Certificate ⟶ Custom
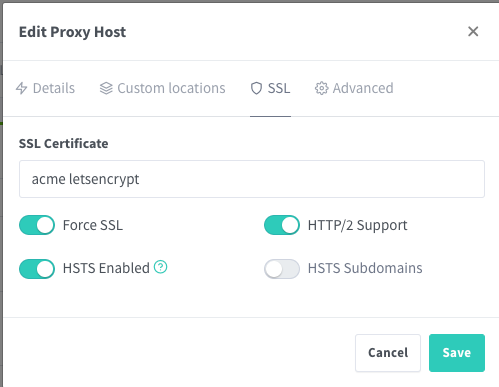
Configure local Let's Encrypt SSL from NPM
Enjoy your Local Let's Encrypt 🚀⭐
User Devices
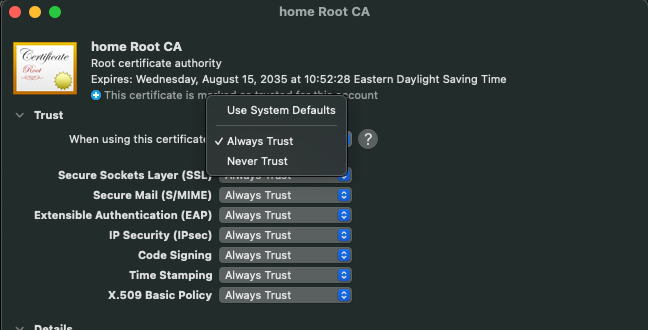
Connect to your LabCA web interface and download the Root CA. Then, install and trust the certificate on your devices.
This step is required for your devices to recognize the Private Trusted Certificates.
MAC OS
Install the certificate into your system directly from Finder (double clicks) or from Keychain Access by importing it.
Once imported, from Keychain Access, open the certificate and choose to Always Trust it.
Windows
Download the certificate, change the extension file to .crt, then you can follow the Microsoft documentation: Trusted Root Certification Authorities Certificate Store.
[success] Tips
If your browser was open during the procedure and you still have an untrusted certificate, ensure closing all windows and open it again.
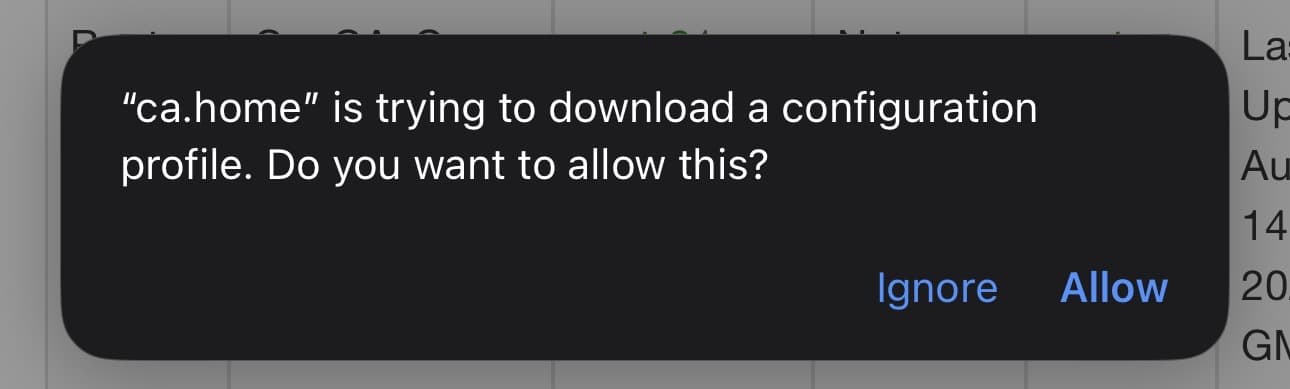
iOS
Download and install the certificate from Safari (other browsers do not allow the installation of certificates).
Once installed, go to Settings ➝ General ➝ VPN & Device Management ➝ Configuration Profile, select your Root CA ➝ click on Install.

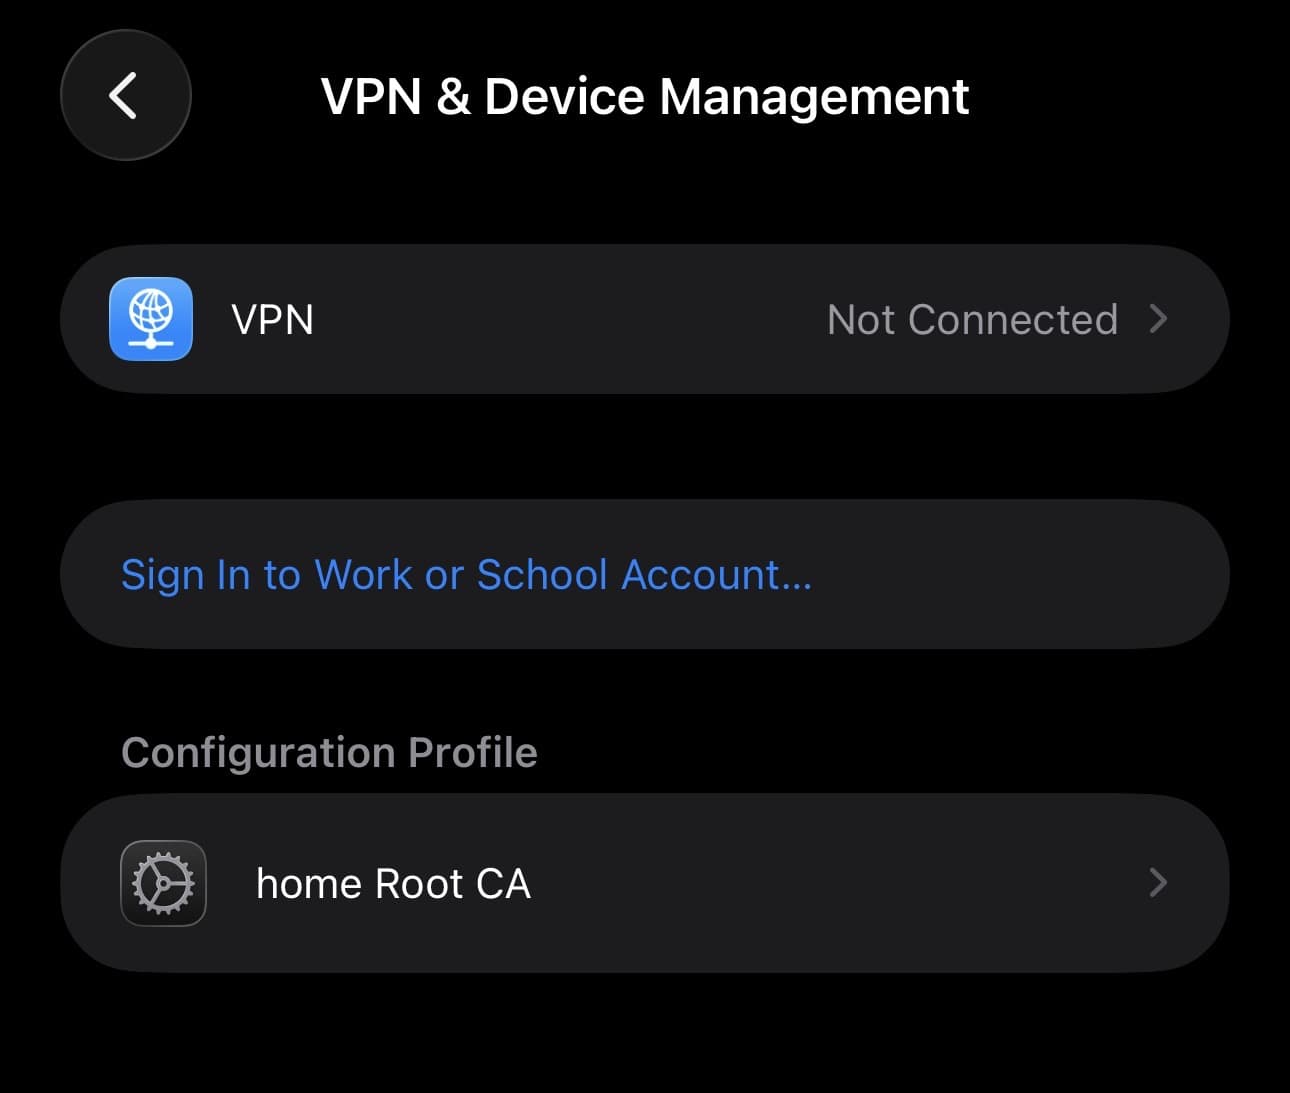
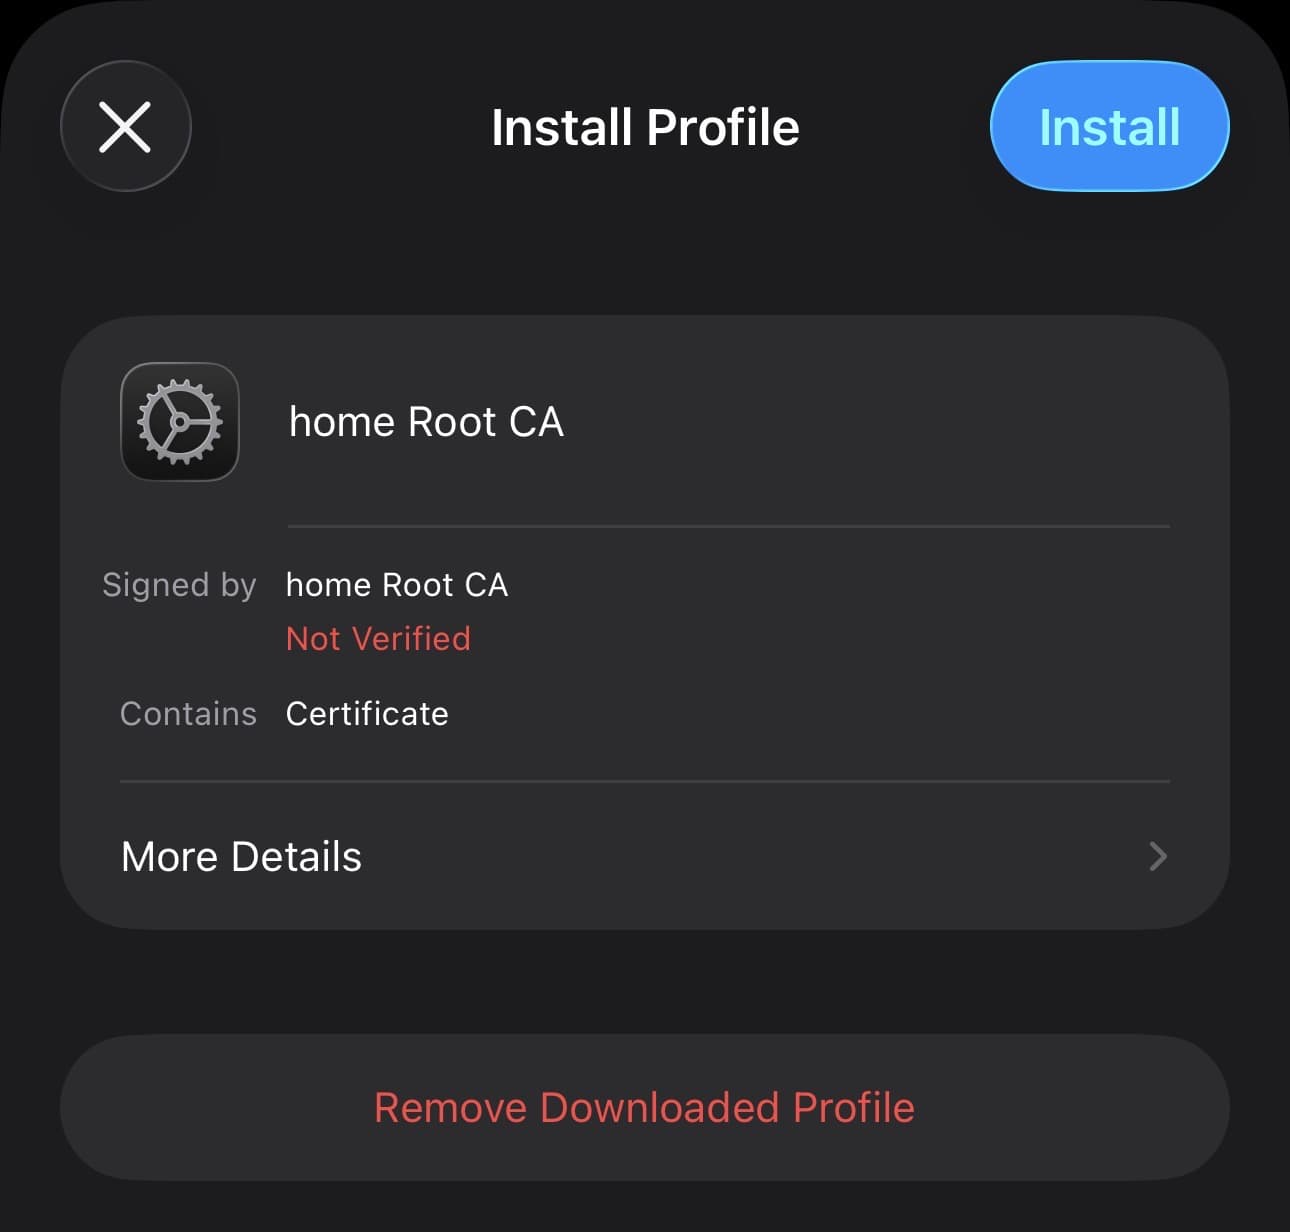
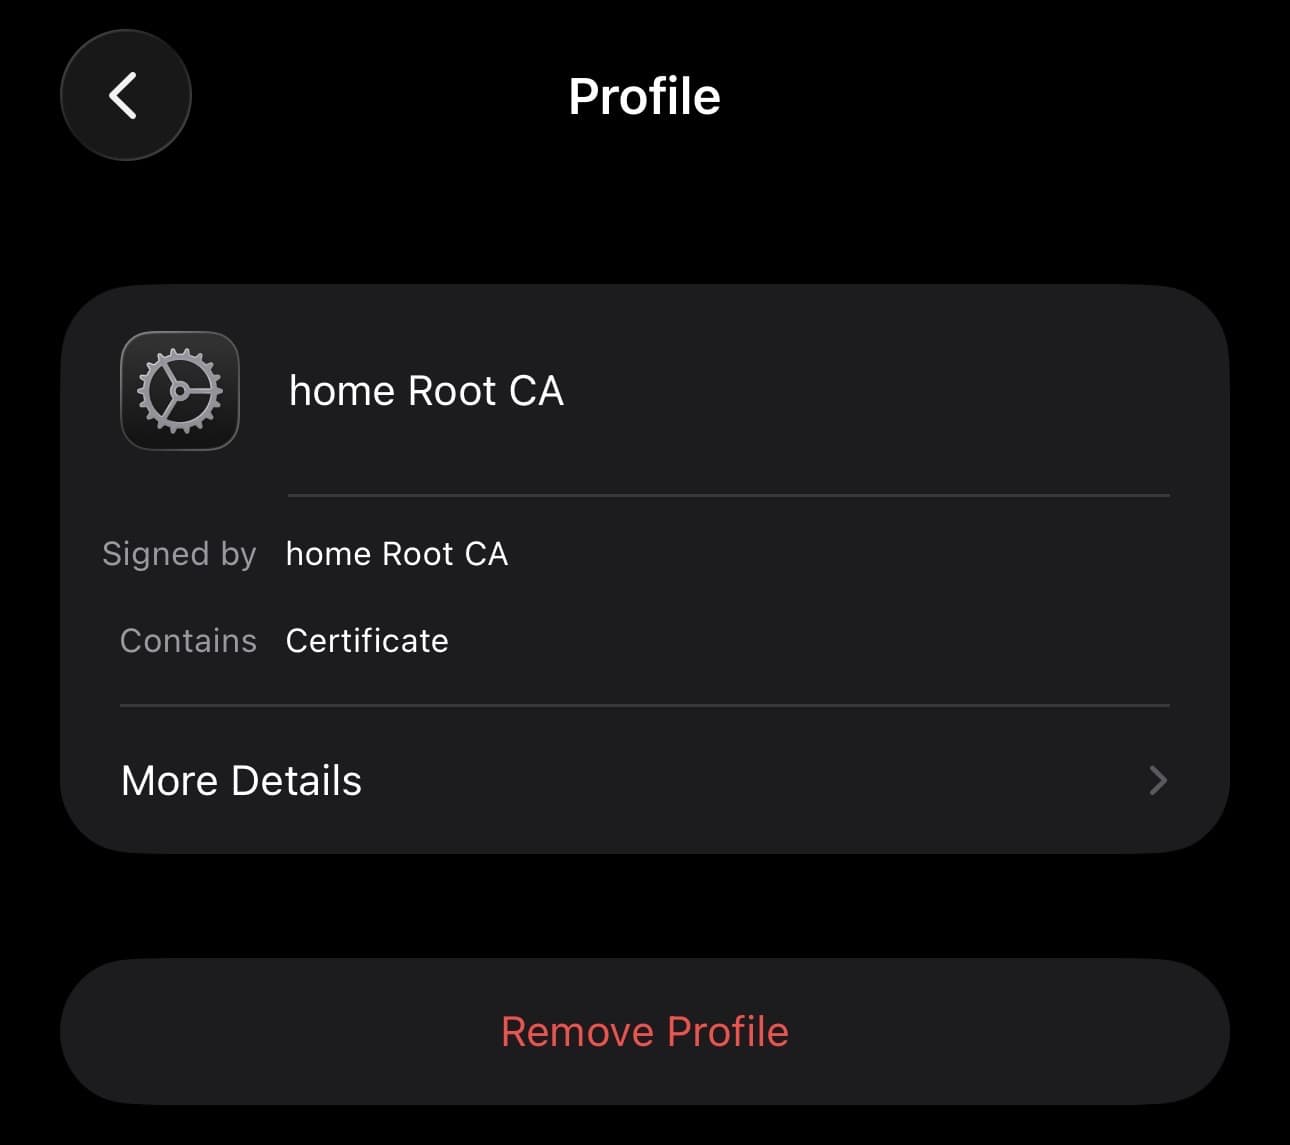
Install iOS self-trusted certificate
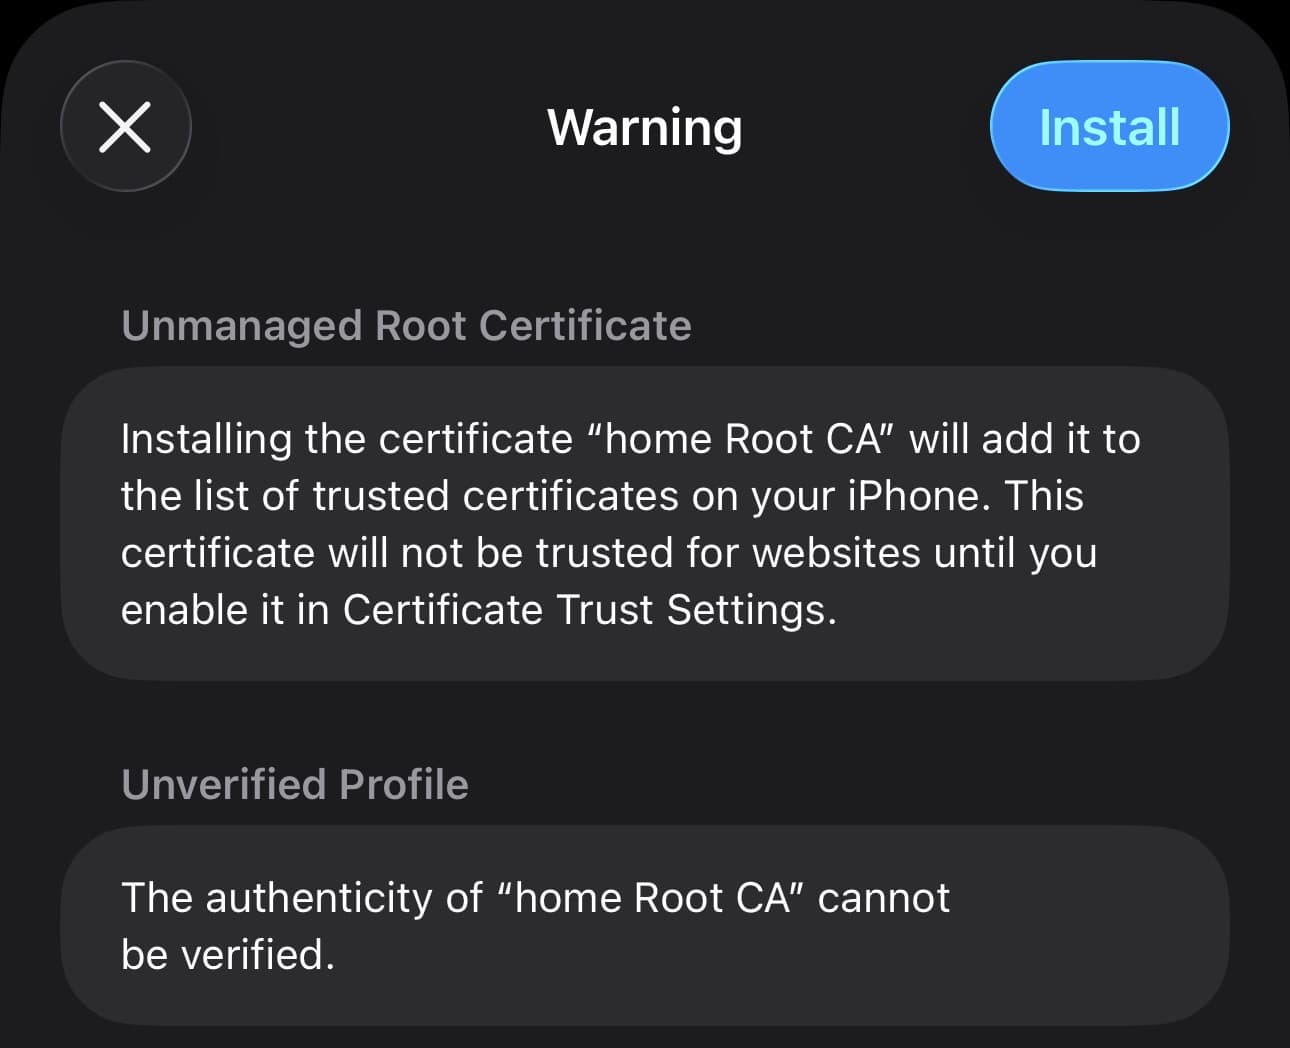
Now, you have to trust it, go to Settings ➝ General ➝ About ➝ Certificate Trust Settings ➝ Click on the toggle at the right of the Root CA.
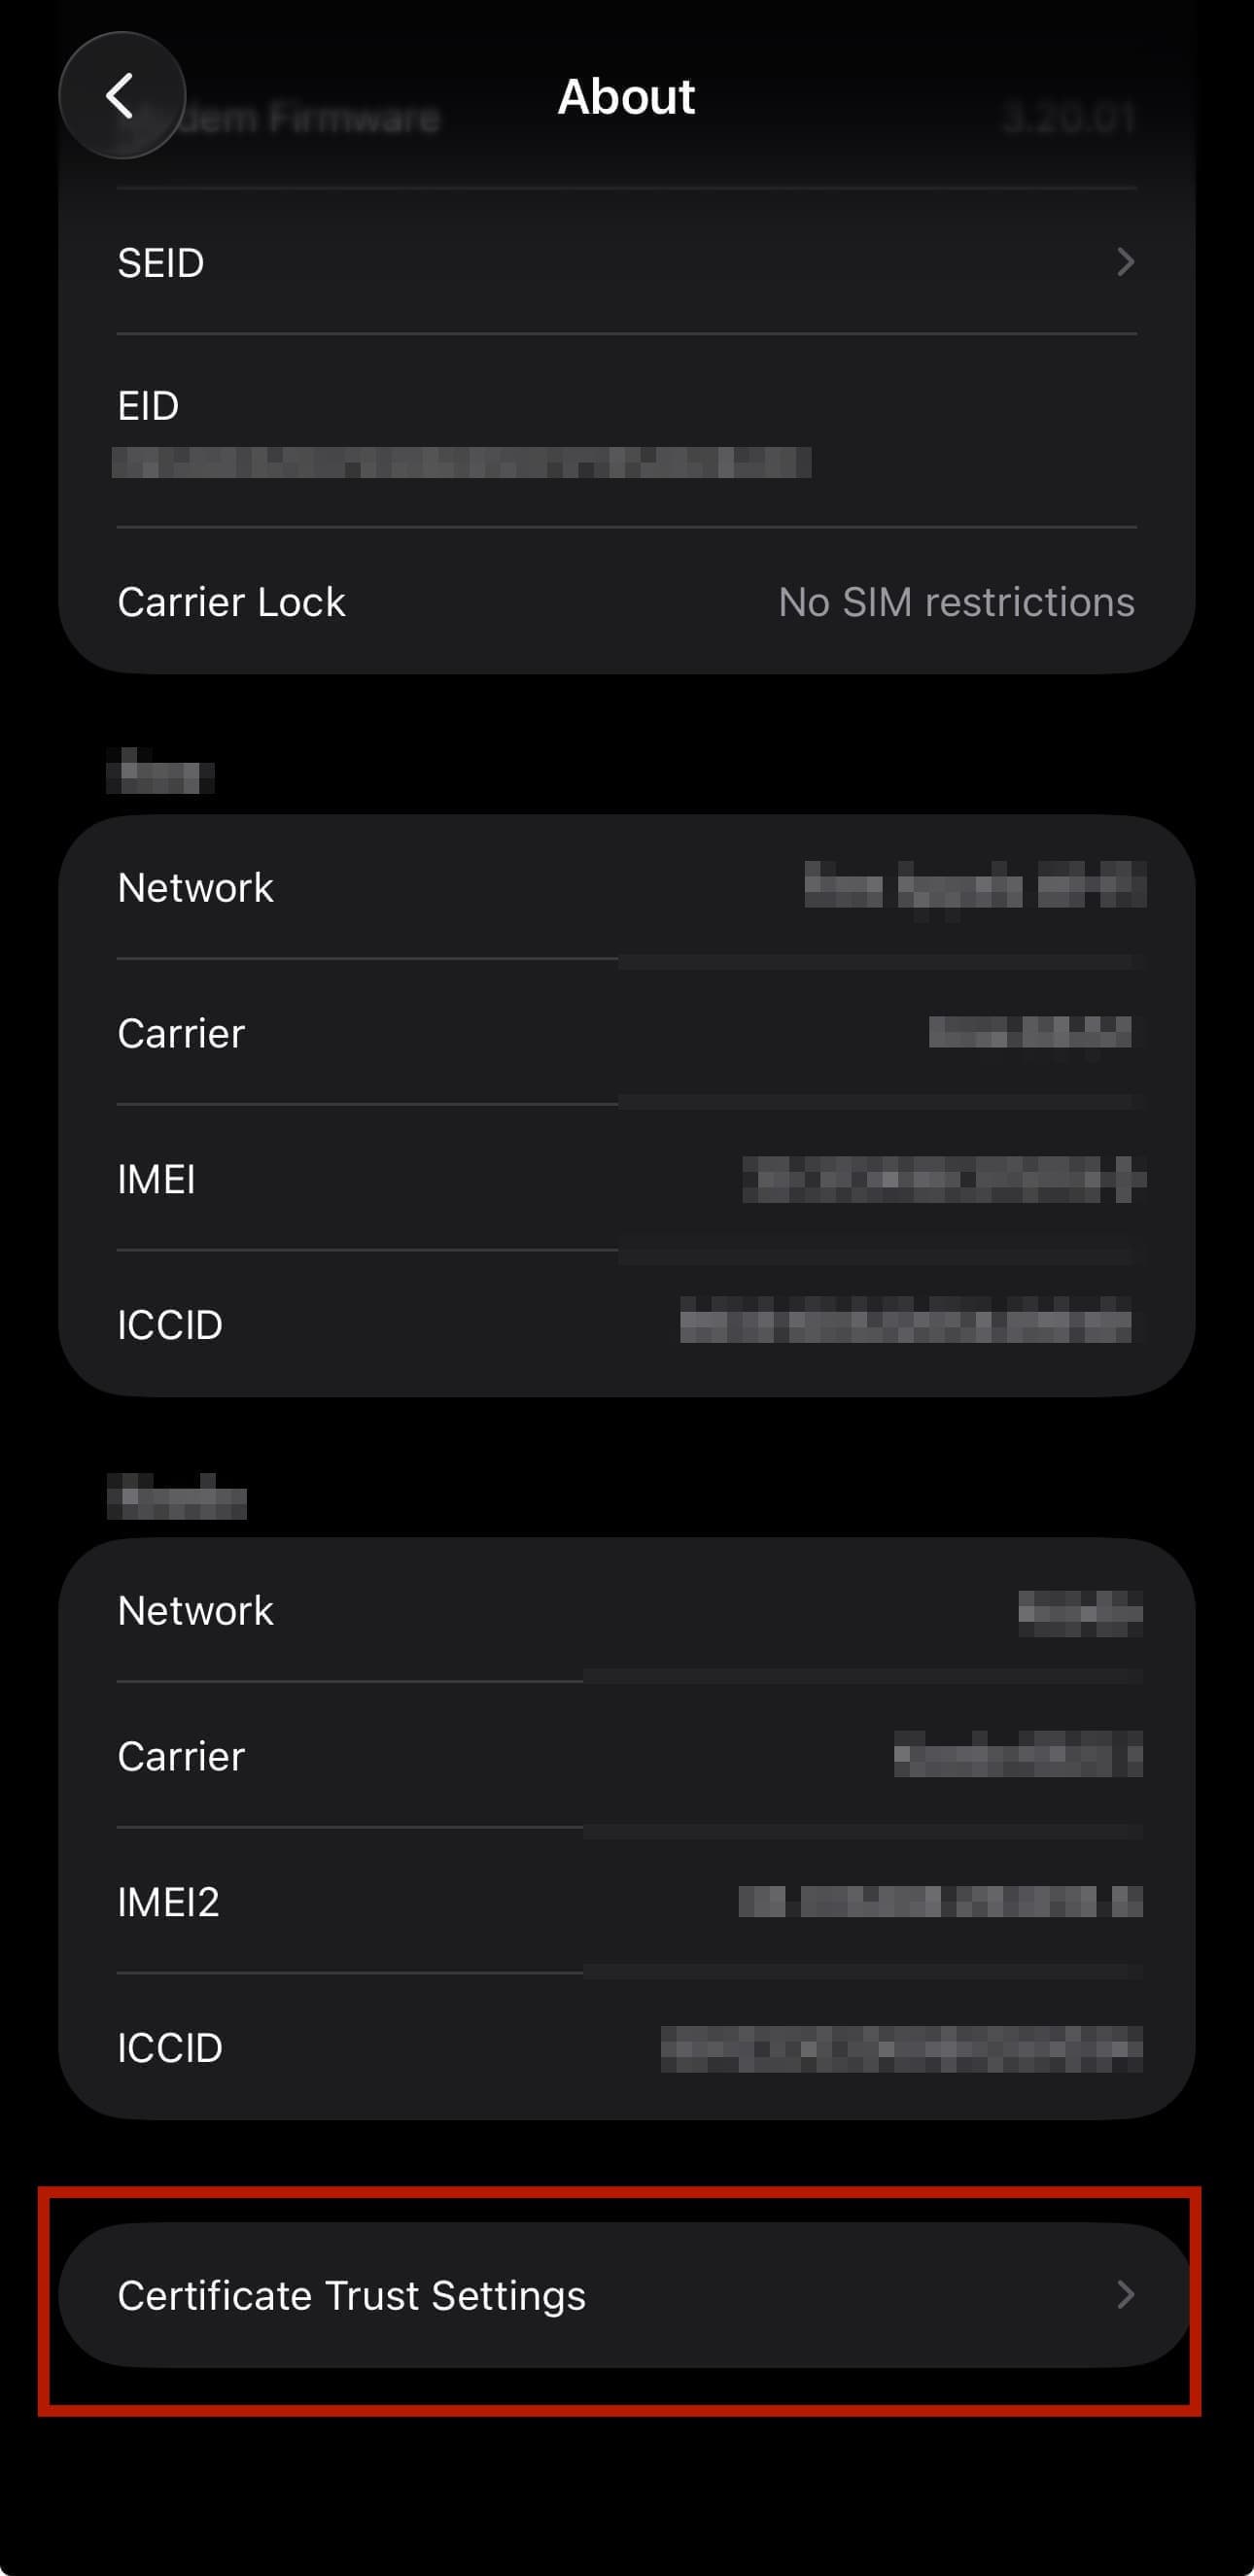
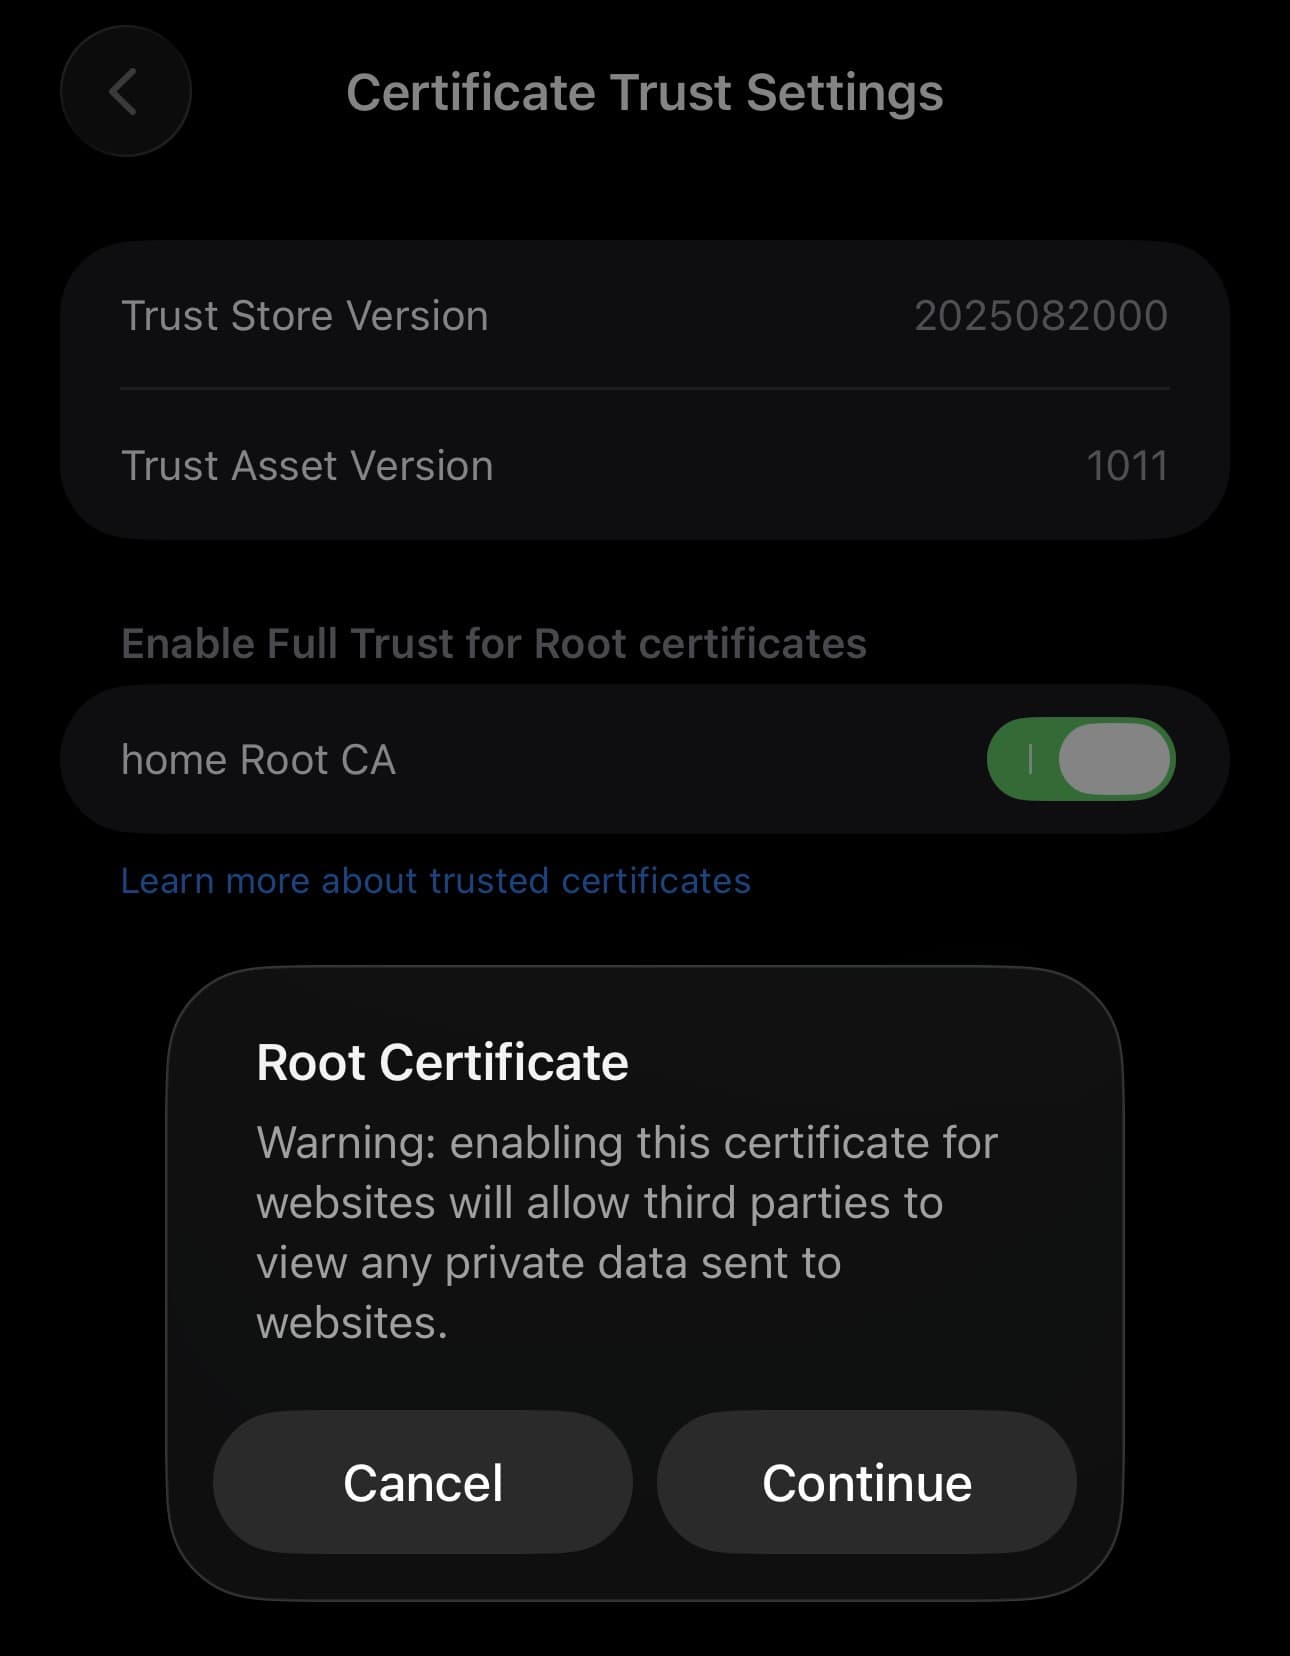
Trust self-trusted certificate on iOS
Now, all of your devices can connect to your services, apps, etc., with a green lock.
Hoping this post will help you 🚀
You may also be interested in